Search this blog

Monday, March 13, 2023

Looking for a Tiltall "foot"? go Cannibal!

My answers to an occasional inquiry, but lately, one coming more frequently.  Where to find a replacement foot for a Tiltall? That, as I say here, "is a knotty conundrum" with no perfect answer.  And, an earlier post here.

Short answer: In the USA, get a rubber cane tip at a Home Depot or Lowes for the missing rubber foot.

Alternatively, try the ancient, tried and true, rite of Cannibalism!! put up a "watch" on eBay of an exact match of the Tiltall that you own - as each company changed the design of their foot "solution" [as the image above].  So, be it the original Marchioni, or Leitz, who purchased the design from the Marchioni brothers. Or, Fred Albu's Unifot and StarD, or one of the three or maybe five other iterations - get a matching used Tiltall to the one you now own.  Your tasty victim can be less than cosmetically perfect.  Then blend the Tiltall you have with any interesting parts, including a foot or two, from the one purchased on eBay. [And sell off the remaining Tiltall morsels on eBay - sell a handle, here, a column or leg, there, that eyeball, afar.]

More history and a selfie with the current owner of the TILTALL trademark, Oliver Yang.  FYI- even the new feet of Oliver's current production of models "TE-01S, TE-01B, TE-01G" do not fit his own earlier KingHome Tiltalls.  As with most everything else in life, the "show" and the "improvements". . .must go on.

The short story below - Left: Oliver's new feet. Do they look familiar? NOT.  On right: Easiest solution. In the USA- Lowes, Home Depot, Ace, and most medical supply stores.


Saturday, March 11, 2023

Tiltallsupport's Telescoping Headless Column

A "headless" monocolumn option for folks wishing to add a monoball, gimbal or fluid head to their classic Tiltall tripod, but who did not want to destroy their Tiltall head and column assembly in the process.
  
Introduced ten years ago - now (March 2023) in its fourth production - yes we have inventory - thank you all for the nice response.

Telescoping Monocolumn concept:  Shown left and below.  The clever Marchioni brothers used the same diameter tube stock in their original Tiltall head and column assembly as they used in the upper, and largest, leg section.  An efficient use of materials and necessary extrusion dies.  Ofcourse the outer leg section telescopes to the next diameter down, and etc.  So with just a bit of lateral thinking - ergo - why not a telescoping monocolumn using the existing "leg" tubes?

Color: No option! Everyone seems to prefer black - so with Henry Ford's 1909 suggestion, "You can have any color as long as it's black."

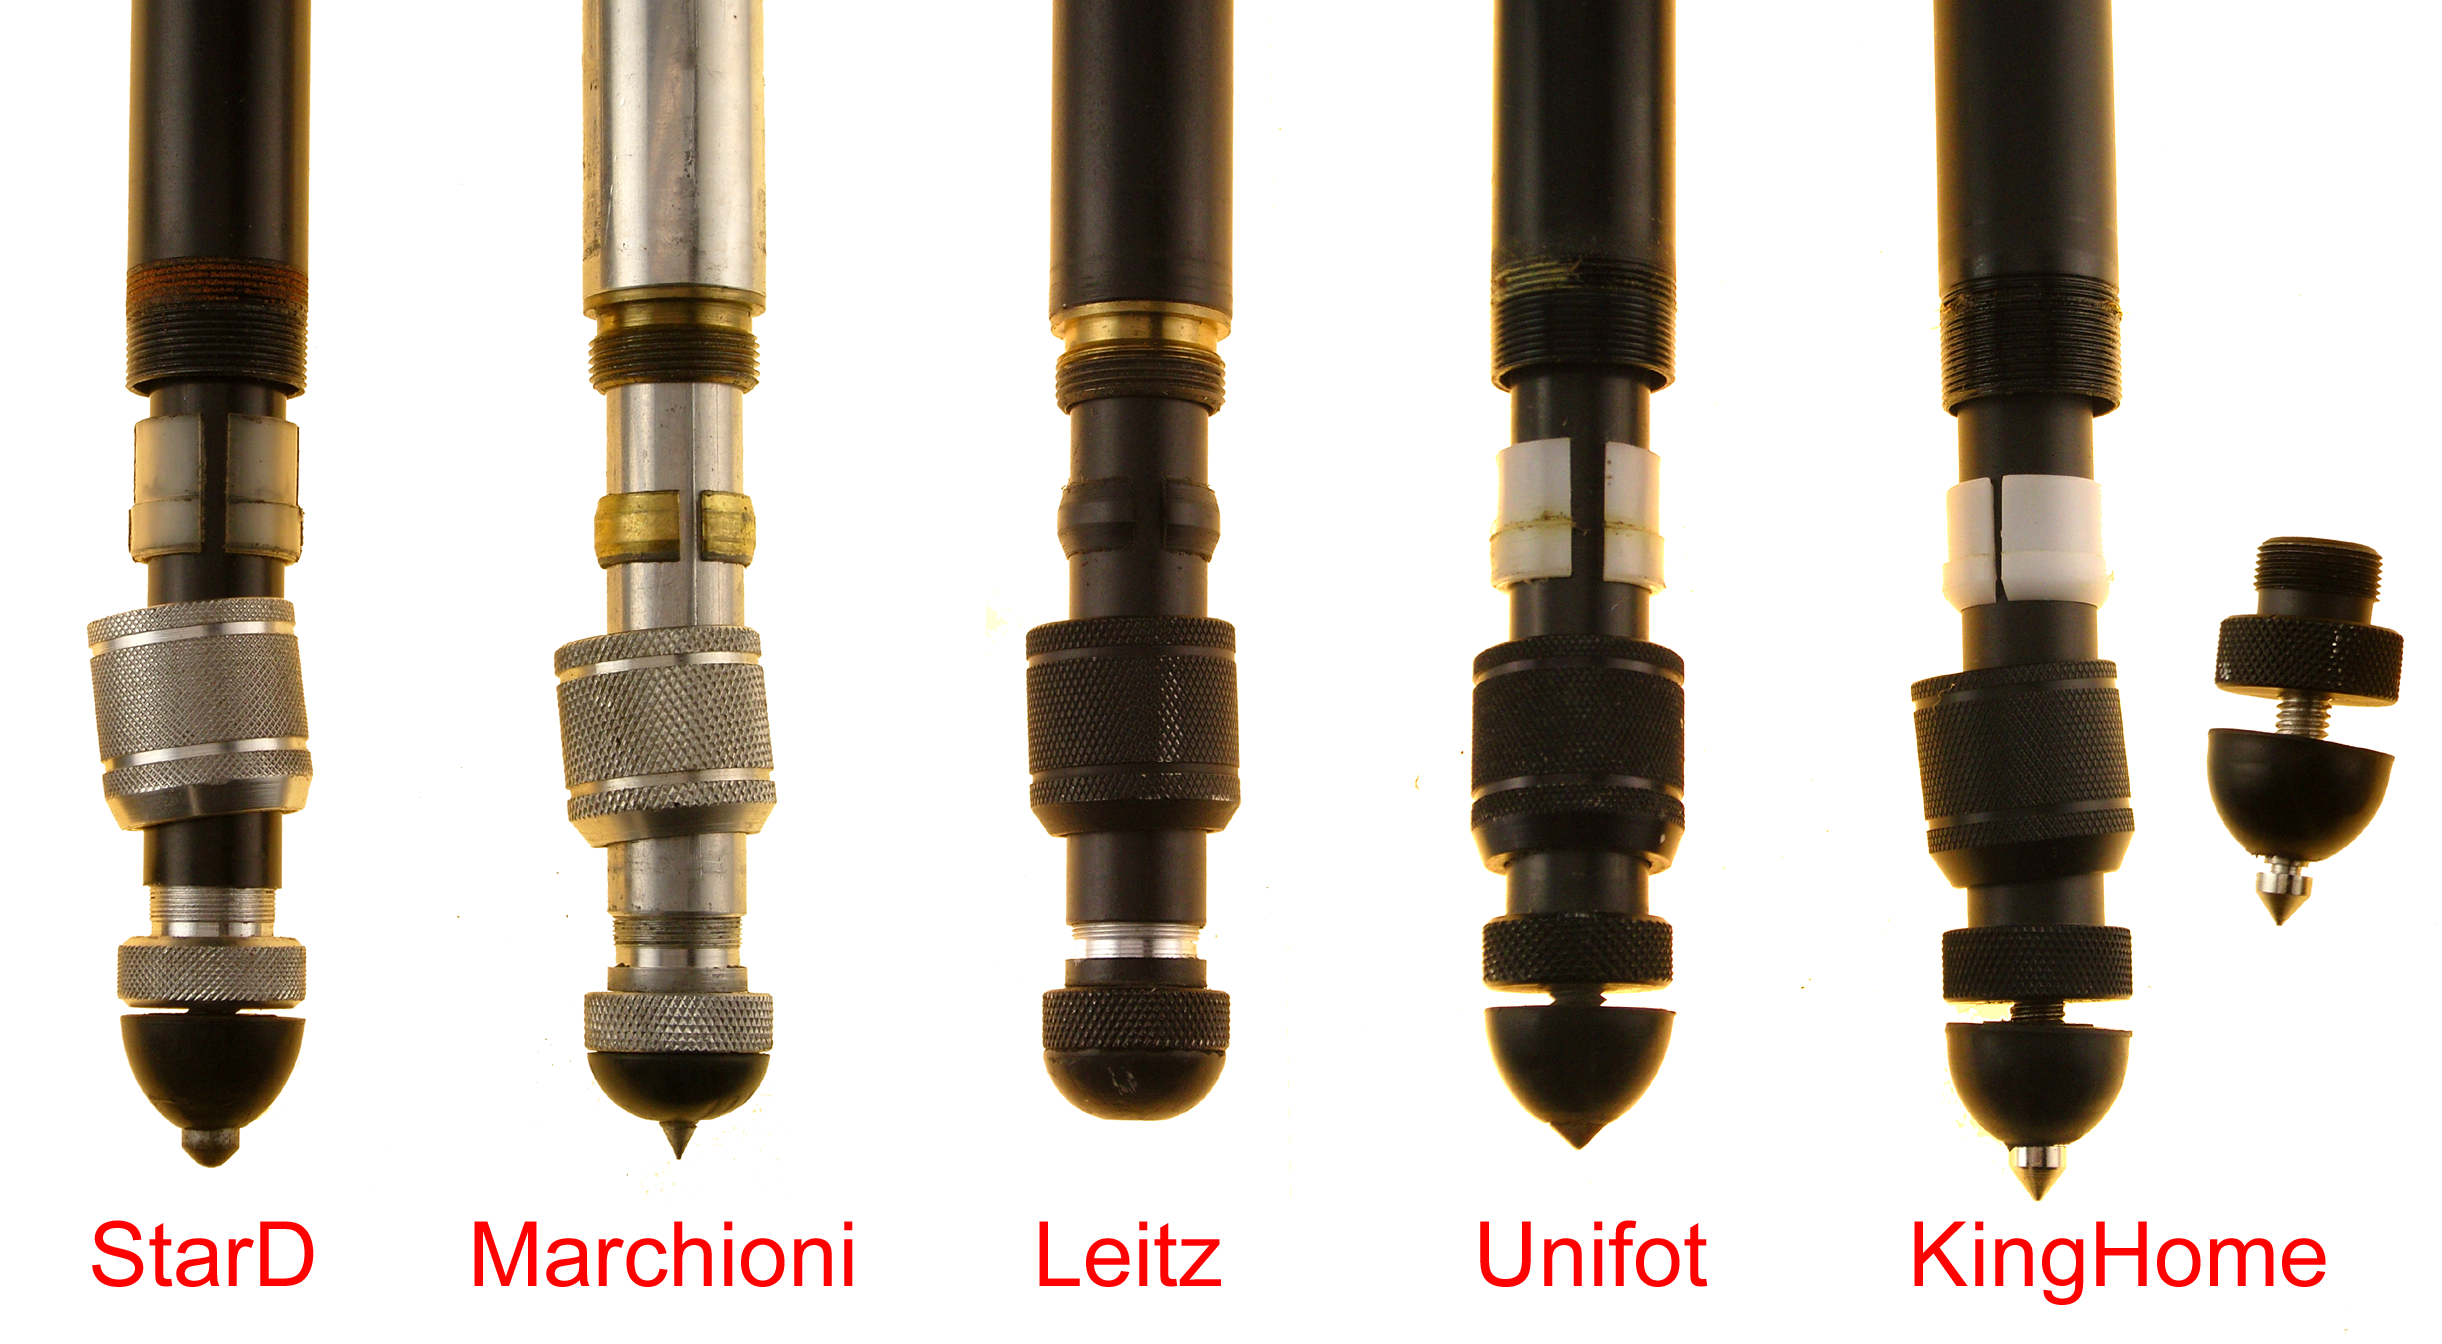
Compatibility: Headless column works easiest (a possible inner bushing switch) with the iterations that followed the original Marchioni Tiltall.  So, ready compatibility with Tiltalls by Leitz, Uniphot/StarD, Omincron, and the present, KingHome.  The original Marchioni is possible with the brothers' later designs ( "shoulder" version with a removable bushing), but, please, with some discussions by email before purchase - garyregester(at)gmail.com - please do not order for a Marchioni original Tiltall without this conversation.


Caveat!:  Telescoping column - I am the leading anti-column rise proponent. Shoot ONLY from that top apex (meeting point) of the three legs and never, ever, never use an extension of a column - period - much less a telescoping column - OMG!  Some have questioned the need of a telescoping column - but extended or not, a double walled column aka a heavier column probably helps dampens any vibrations better than the original single walled column.  AND, if ever pressed to need to be just a little bit higher, well, then, OK, extend the column and, yes, maybe even deploy that telescoping feature you just happen to be carrying aboard your Tiltall.  

Price: $65 includes USPS Priority service within USA.  Orders outside USA, $45usd plus actual delivery costs or we can use your courier account.

Specs: Diameter of larger section 32.06mm / 1.262 inches; Diameter of telescoping section 25.40mm / 1.000 inch; Overall collapsed length - 54.5mm / 21.5 inches; Overall extended length - 97.5mm / 38-3/8 inches; Weight - 0.44kg  / 15.4 oz  Shipping weight: 0.60kg / 1.3lb  Additional feature:  The 3/8"-16 "top" thread stud (shown left) can be reversed to a 1/4"-20 thread.  Also, this column fits some of the lighter duty Gitzo modles, such as the Studex - compare ID of column "tube".

Last, YES, we have NO Monoball Heads - None, Nada, Zip - Again, we do not plan to market any monoballs or video heads.  We believe this a very, very personal decision.  And, though, China's monoball designs are gaining on USA and EU designs, they ain't there yet. Take a look at our earlier blog on this subject for suggestions.

                                                                    ***************

      INSTRUCTONS: Take a read through this entire list to get an overview before you begin - and better, before you order.
      Step 1) Remove existing Column - first, bottom column stop - Remove ring (Marchioni, Leitz) or solid metal stop (Leitz, Unifot) or TEP6 1/4"-20 camera placement (Unifot, StarD, KingHome) from the bottom of your existing column.  Loosen column handles, then raise and remove your existing column.
      Step 2) INSTALL NEW COLUMN. Remove the TEP6 1/4"-20 camera placement from the "bottom" of your new headless monocolumn and reverse the installation as above.  This is a hand job, no pliers.

      Step 3) INNER BUSHING. Your existing inner bushing strip - may or may not work with the new column.  Leitz in particular is thicker.  Dont mislay the existing inner bushing as it is your template for the new one.  [Also, dont lose track of it, so you can again use the original column/head.]
     Step 4) FIND New Bushing. Now in less than 15 minutes you are going to find that new bushing - make a slow wander of your studio/workshop and/or home - think: plastic milk carton; slice of a plastic 35mm film can or the film itself - 35mm, better 4x5; a plastic 8.5 x11 inch term report / presentation cover. You are looking for nylon-ish, flexible, a little "tooth" perhaps - a stiff plastic bag - a candy wrapper or other wrapping material.  Cut to match dimensions and install in groove - you may need to make a couple or three tries.  I could send you the strip bushing, presently made, but it would be too thin or too thick.  Let me know what you ended up using and I will add to the blog. 
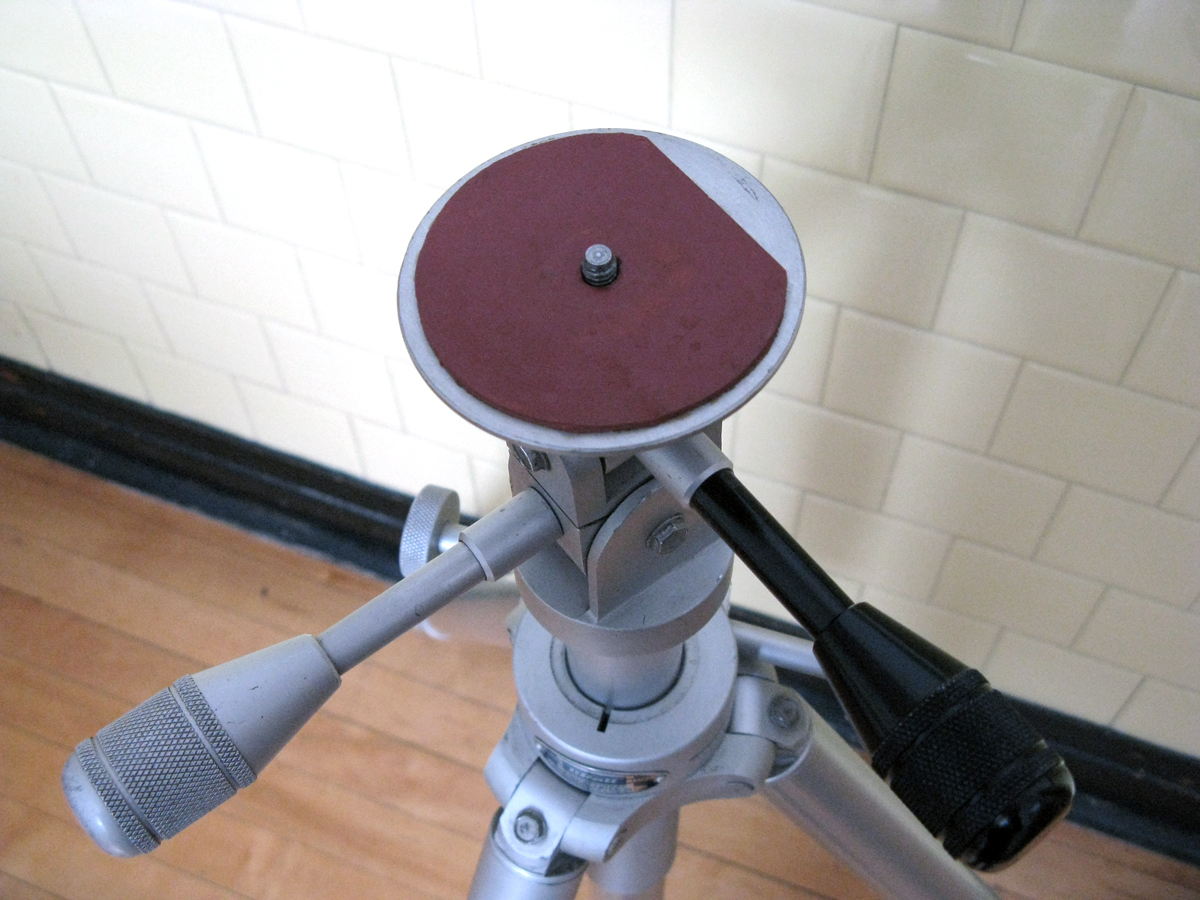
     Step 5) TOP PLATE - "top" 3/8"-16 stud (used with most ballheads/videoheads) can be flipped over to switch to a 1/4"-20 stud (used with a few heads and quickreleases).  Note two small allen studs, one is a registration pin - the other, the stop to allow the stud switch over. Unscrew top allen, flip stud, screw down and secure with allen stud.

       Let me know (by email) where I am not clear - this instruction writing business is never easy.

Wednesday, December 14, 2022

Tiltallsupport's Side Arm Clamp - Easy

Click to enlarge.

A] Remember when we said "Buy our 'headless' monocolumn option to add a monoball, gimbal or fluid head to the classic Tiltall tripod. Especially, for those who did not want to destroy their Tiltall head and column assembly in the process." No?  Take a read here.

So, as photo above, to create an inexpensive "lateral side arm" for overhead images of books, flowers, eBay objects, etc - buy this altered SuperClamp, go find your un-destroyed Tiltall head and column assembly and, on top of that monocolumn you purchased earlier - dah, dah, an inexpensive side arm.  Read on, but price of altered SuperClamp with shipping is $27.50  Order/inquire here.

B] the Altered SuperClamp - for reasons known only to the designers of Manfrotto, Matthews and Kupo - their SuperClamp has a 1/4-20 or M6 hole in the center of its base - I have never learned why - and why M6, folks?  Either case, not so good for attaching to 3/8-16 threaded tripod columns.  Yes, you could buy the appropriate adapter insert to join a photo standard 3/8-16 thread - we have all tried this and learned that by the third photograph - mysteriously - the adapter insert has loosened, so as to be completely worthless.  Why not simply tap the center hole to 3/8-16 and be done with it? So, the idea is free - get a tap, grab one of your SuperClamps and cut to it.  But if you just want to buy one - price $27.50 with USPS priority post.    Order/inquire here.

C] Telescoping Side Arm - which brings us to either, "I cant find my original Tiltall head/column" or "I would need more reach than the original "head/column" provides."  Get a SuperClamp with a second telescoping monocolumn.  Priced separately, an altered SuperClamp is $27.50 as above and a telescoping monocolumn is $55 as here.  Purchased together with shipping - $72.    Order/inquire here.

Note- not so much with the short Tiltall head/column, but with the longer telescoping monocolumn, expect to need a counterweight for balance - a second SuperClamp and shotbag, nah, joking.  Strapping tape and a water bottle will do just fine.

Tuesday, November 3, 2020

Tiltall - the next generation.

Casper, Wyoming, 10:15 am August 21, 2017 - count down to eclipse. Photo by Lou Berlin. His notes: The 3" f/5 Newtonian telescope is a "homebuilt" telescope which means I made the mirror at the Adler Planetarium Optical Shop in 1977 and used a mix of commercial parts and custom parts I had made by a machine shop.  Actually, it's three Marchioni # 4602 Tiltall tripods that I have.  They were nice when I got them, but I also used Flitz metal polish on them and waxed them with Turtle Wax for cars.


Tuesday, September 29, 2020

Notes on column bushings [and secret travel tip]

Good question from Singapore - "Will likely purchase the headless column from you. Is it an easy install? Could you send a photo of the column brushings?"

Good choice Lietz. So your questions - ease of install? As a step to learning about your new/old Leitz, here is one of the features of all Tiltalls and during this "quick tour", you will learn how easy (or not) it is to install my column.  If you need to photograph, as an example, flowers, a small object, art or pages from a book, the Tiltall design allows easy [my opinion] reversal of the column - so that the head and camera can be used down between the extended legs.  Let's refer to its exploded drawing. Maybe print this page for future reference.

Remove the stop ring [035] at the bottom of its column/head [stop ring/disk is threaded] and raise the column up and out of its "sleeve" [025, 029-033].  Turn column/head upside down and push up into sleeve from below and between the legs.  But before you do that. . .

A caution here: there is a circle/tube of felt ["033.5", no number] or similar, just inside the lower edge of the column sleeve.  Reach inside the sleeve to learn if the felt is well secured - sometimes with age, the edges [top or bottom] may have become loose.  If loose, remove carefully and replace it with a circle of adhesive loop velcro [do not toss original, this is your template].  This lower bushing is for stabilization of the column and is a VERY necessary part - the circle should completely wrap the inside of the sleeve but not overlap.  If you dont find any felt (or similar) inside the bottom edge of the sleeve - oh, no! gone missing already - replace using an experimental strip of paper to determine circle size of loop velcro.

As for the top bushing [024] better to take a look yourself - while you have the column removed [above], look just inside of the top of the column sleeve.  There you see the bushing you are asking about laying in a channel.  With the Leitz, my column usually works with the existing bushing.  With the variation of age and original materials, your bushing may need to be renewed. Why? Have you checked if you tighten the handle that controls the rise and fall of the column through the sleeve, whether or not, you can still push the column down [or up], if so, then it is time to replace the top bushing with a new one.  Unfortunately, no one at this time makes production bushings that fit the earlier Titalls - Marchioni, Leitz, Uniphot, etc. - it is really a do-it-yourself project best described in the instructions at the bottom of this entry here

Another column travel tip - you can store your TEP handles for travel - at least a couple - inside the column by removing the stop ring at the base of the column and placing them inside - true even with Marchioni and early Lietz which are truly a stop ring rather than a disk [later Leitz, Uniphot] or disk/thread 1/4-20 [later Uniphot, Kinghome]. Good idea to put the head of the final handle towards the ring/disk.

Wednesday, May 15, 2019

Cleaning the Four Handles' Hidden "Stems"

At right, my "bevy" of the original Machioni Tiltalls are, of course, the oldest in my collection of not more than forty Tiltalls [the limit made by my wiser better half].  Here are some thoughts on cleaning the 1/4-20 threaded bolts or "stems" hidden in the handle placements that control the rise/fall and pivots of the column as well as the handle placements of the namesake "Tiltall" camera head.

    How has all this grit and grime found its way into, around and onto the handle stems? These wonderful Tiltalls are 45 to 70-year-old artifacts - just happens! - look at their owners.  If you are reading this, you are no doubt planning to use your Marchioni for another 70 years and pass it onto your great grands.

     So cleaning. It is hard to get even a paper clip down and around in the space between the hole's wall and the threaded stem.  In fact, maybe impossible to get any of the gunk out in any way. Take a look at the suggested trio of lubes - Illustration A - the usual suspects - Three-in-One oil, white light grease and WD-40. Note the last two are in their aerosol iterations which I found a bit quicker and easier to work with.

   Illustration B - loosen the grit/grime with some "blasts" of WD40 into the hole with one of its "straws".  See that I am working out on the driveway to minimize clean-up.  But keep some paper towels at the ready.  Let WD-40 set for 40 seconds or so.  Maybe tilt the Tiltall on its side and back to stir things up. Then "pour" any excess into your paper towel.

    Illustration C - next, get some grease into the hole.  But don't try to fill the hole.  Then insert and screw your handle onto the stem.  The hope is that that handle is your "scrub brush", that the WD40 and now the grease has loosening the micro grits and is mixing with any older lubrication.  You probably should not wind the handle down into the hole more than halfway.

    Now, remove your "scrub brush" aka handle, and - Illustration D - twist a Q-Tip down into the hole in the handle which should be full of a fairly nasty brew of trouble. Repeat with the other end of the Q-Tip and probably a couple more until the handle seems empty of crud.

    Dive back into the hole with your handle and wind down a bit deeper on the stem and repeat the above.

    You should notice a marked improvement in turning smoothness that second dive - and then understand where we are going.  Once you are happy that your "scrub brush" aka handle and your Q-Tips have brought up the majority of the problem, I think all that is needed for the next, at least 40 years, is a pea-sized dollop of light grease into the hole of the handle.

    Notice in my "Bevy" photo above that the far left Marchioni's column is flipped upside down in its outer sleeve for photos made down between the three legs.  Why?  For all your close-up flower photos, of course.  Also to copy flat art on the floor that is too big to scan in an A4/legal scanner and such.  We are going to discuss that outer sleeve next.

    Last note:  Your column passes through a five-inch [13cm] outer sleeve below the two handle placements that we have been discussing.  On the bottom inside of that sleeve, there should be a two-inch-wide "bushing" from a circle of ancient adhesive material.  This bushing stabilizes the column.  If you have cleaned your handles and stems [as above] and tighten the handles down, the column may still move back and forth if this bushing has gone missing. [See exploded drawing - it is the unnumbered part between the "033" outer sleeve and "034" bottom rubber stop.] In four of my five Marchioni Tiltalls, that "bushing" has blown the coop and my columns rattle around even when I think I have tightened everything as tight as possible.  If this is true on your Tiltall [any iteration], remove the column and put your finger up into that 5-inch sleeve to "see" if something [you didnt even know about in the first place] is now missing.  If so, the solution is a length of "loop" Velcro at least one inch wide and four inches long - sewing shops, Home Depot and Lowes sell this loop and hook velcro in small packets.  Pull the backing off, wind it up as tightly as possible, carefully insert without touching the walls of the sleeve until you are in position.  It will make sense when you do it.


Wednesday, April 24, 2019

Continued innovation - Stephen Haverl

Here’s my version of the Tiltall conversion mount. The 1.25 “ aluminum column is epoxied into a deep round mortise that also is where the 3/8 stud is mounted. The top plate is oak cross laminated to 1 1/2” thick and cut into an octagon. On top is a Manfrotto 3030 head that has a telescope clamp box with a 1/4-20 screw. WORKS LIKE A CHAMP !

Friday, June 22, 2018

Eyelet at the base (and top) of the Tiltall column

There is a perennial thought to carry a Tiltall tripod with a clip-on camera strap attached to the Tiltall column - top and bottom.  Either by using my headless column offering or with the Tiltalls from the Uniphot to the KingHome present [ie having a column base stop with a 1/4-20 stud. Something that the original Marchioni, nor its successor, Leitz, do not have - more, a donut design.]

You will need an eyelet.  Here are two photos:  the question and an answer.  Order from McMasters here - $5.30 each - I dont need to be the Middle-Person.  "Question" photo from Wes Roberts.

Sunday, April 15, 2018

Tiltall's Secret Monopod

Following note written in response to a recent request for a threaded joiner between the removeable leg and the center column/head.  Great idea, never have seen such a nexus and any of you machinists that would like to offer it, let me know.

This is covered in earlier blogs, here it is again-

"There is the secret monopod that comes with all Tiltalls since the Uniphot (Fred Albu) in mid-1980.  A convertible idea - tripod with head changed to a monopod WITHOUT A HEAD.  You had to carry an extra head.

"One of the legs unscrews and joins to the removeable stop at the bottom of the column. Stop has a 1/4-20 threaded bolt (Marchioni and Leitz have the stop - usually hollow - but never with the thread.)

"Again, the nexus between the column/head and the removeable leg is a great idea - chat up a teacher at your nearest city college machining class - but the resulting monopod, yes, WITH a head would be 7 feet high. Again, good idea - I have never seen it.

"If you wanted only a monopod - this idea was huge at the NABshow.com [Apr2018] - meaning that there are more and varied monopods available at this time then ever before.  And probably for less than the cost of creating your leg/column nexus." 


Saturday, September 30, 2017

TEP1 handles in hand

We now have very good inventory in the single handle I offer - the TEP1.  Some of you have inquired a good time ago.  Please re-send your interest and address.  Handles are $18 includes postage. My direct email is garyregester (at) gmail.com

 If you have reviewed my order page, this is the only handle I suggest.  I do keep a few of the longer TEP 2 in stock, but do not recommend the recently re-designed, now smaller, bullet-shaped version of the formerly squared TEP4.

[The even smaller grip area of the TEP3 handle stopped back in the day of the Uniphot/StarD/ Fred Albu Tiltall.]

Important NOTE: - as earlier blog post - Leitz and Marchioni Tiltalls may need a spacing sleeve (Home Depot or Lowes) to effectively lengthen the present iteration of the TEP1 handle - that is, if the 1/4-20 bolt is extending out from the cover sleeve, you will need a spacer because the current threaded hole is not long enough.  Subsequent iterations - Uniphot, StarD, Omicron and present KingHome, do not need to be "lengthened".

If you want to go with the original handles, then put up a search on eBay and watch for a good price on an entire Tiltall -  then blend together with yours - mixing the best of the two into one.  Stick with the same iteration - Leitz with Leitz, Uniphot with Uniphot, etc.  Handles are interchangeable, but blending feet and legs go best with same manufacturer.

As you have probably learned that all four of the original Tiltall handles - short top bullet-shaped TEP1, long top bullet TEP2, rise/fall disk-shaped TEP3 and pan tube-shaped TEP4 - were interchangeable from any of the four positions.  So, it follows that the single bullet TEP1 - my sole offering - can be used at all four positions.  For history buffs: TEP3 seems to have ended with Uniphoto Tiltall in favor of two TEP4s. TEP4 was replaced by a tiny bullet shaped handle about two years ago.

Saturday, April 1, 2017

Leica Quarterly re: Tiltall 1982

From Gordon Brown, Boulder, Colorado- For your collection, a scan of an article promoting Leitz Tiltall tripods. The July 1982 article in the Leica Quarterly includes part numbers. I recently found 10 issues of the publication. Interesting reading, with articles about different dealers, most of whom are no longer in business.


Monday, May 9, 2016

Especially Tiltall feet and leg bushings. . .

I answer this question weekly.  OK, not every week, but every third week.  Current production of feet and leg bushings, in particular - see the many and several previous blog posts - DO NOT match the feet and leg bushings of any earlier iterations - not any, not nearly, nada.  Here is my typical response, on a good day. . .

ScottyOne-   My suggestion - in your case - the feet and bushings - is to commit the ancient, honored, but not forgotten, art of cannibalism. That is, check eBay and buy an identical Tiltall tripod. AND, by "identical", very important, we mean identical! be it a Leitz or Marchioni Tiltall, a StarD or Uniphot Tiltall or Kinghome or (you name it) Tiltall - there are eight or more legit iterations plus others forms of tripods using the brand "Tiltall" - so be absolutely certain to get an identical matching one. This is not difficult - this forewarning is more than enough for your success.

Then blend your two identical Tiltalls into one perfect unit. AND! . .there is this market, if you have the time . . .offer up (AKA "part out") your remaining un-used handles, column, bushings and feet on eBay and get back more than what you paid for the entire second unit - less your time ofcourse. -Gary

Sunday, November 15, 2015

Notes on adapting current handles to Leitz Tiltall

See enclosed for some photos of my old Leitz Tiltall. The model is #4602 and is an E. Leitz product made in Rockleigh, NJ. It was purchased used in 1979 ($60.00) and I have had it since then. The new short handle is a real improvement for me...easier to carry, set up and use.

Based on my experience with this tripod, here are some tips for your readers:

The camera platform pad can be replaced with a sheet of EPDM rubber gasket material (about 1/6" thick). These are available at most hardware stores in the plumbing department and can be cut to fit. I cut one edge of the circle to allow the aperture ring on my Nikon FM to turn freely. After removing the old pad and cleaning the aluminum plate, you can attach the rubber with 3M transfer tape or sheet. The camera pad could be removed if needed without trouble or mess. The EPDM rubber keeps the camera from rotating and is very wear resistant. Keep the threads on the tripod screw very lightly lubricated. This was done long before I had found your website!

When I received the short black handle, it was obvious it would not thread far enough to actually exert any clamping force on the head. After reading your site, I agreed that bushings would be the best solution. However I felt in this situation steel would not be the best material: consider using a Bronze Sleeve Bearing. The bronze will not react with the aluminum collar or steel bolt and allows the handle to tighten without potentially galling the end of the handle. A steel sleeve bearing could potentially gall the aluminum collar. When disassembling the handles, the collars surrounding the bolts might be loose. Just remove them, clean the bolts and collars with some denatured alcohol. Removing the collars exposes more of the bolt threads for cleaning. The alcohol cuts the grease and dirt very efficiently and leaves no residue. After that, some 400-600 grit wet or dry sandpaper can be used to smooth any rough aluminum on the handle end before reassembly. Put a small amount of white lithium grease on the collar threads and tighten carefully into the body of the head. Use gaffers or duct tape on the collar to prevent the pliers from damaging the collar...tighten 'gingerly.' You want the handle to turn but not the collar! Add some white lithium grease to the bolt and the bronze sleeve bearing and reassemble. It should work very smoothly and exert proper clamping force without having to over tighten the handle.

I ordered the Bronze Sleeve Bearings from McMaster-Carr supply company. To be sure I ordered 1/4", 3/8" and 1/2" lengths of the 1/4" ID x 3/8" OD bearings. Part numbers are: 6381K412 (1/4" long), 6381K413 (3/8" long) and 6381K415 (1/2" long). The 3/8" length works perfectly on my tripod. You might check the 1/4" length for fit and function as the more threads engaged on the handle the better. Price and shipping service can't be beat. http://www.mcmaster.com/#standard-sleeve-bearings/=zer3in.

Some white lithium grease can also be used for the center column and panning locking handles to keep them turning smoothly. When cleaning these handles, always check for galling on the ends and smooth before reassembly.  It is also a good idea to check the brass tripod leg locking bushings. Clean thoroughly and apply a small amount of white lithium grease to the threads. You need just enough to coat the threads without attracting grit and dirt.

Thanks again for your service!

Bob Boettcher
Chicago, IL

Wednesday, March 19, 2014

"Extending" current TEP handles

As in earlier blog posts the current TEP handles are not tapped deep enough for the length of the earlier bolts used in the Tiltall made by the original Marchioni brothers, nor the iterations by Leitz and some Unifot/StarD. Unifot is where the change occured. Here's a solution: Gary- I finally had time to run by Lowes and get some steel sleeves - 1/4" x 3/8" x 1/2" - they work PERFECTLY, just as you indicated. Thank you so much for your fine parts and help. Now I have two fully-functioning classic Tiltalls! With my carbon fiber Gitzo I'm well equipped. These steel sleeves I got are dimensionally identical to the handle - same outside diameter, slide perfectly over the threads, perfect function. It's a "Hillman # 880414" - Steve

Saturday, March 1, 2014

GUNK! Who knew?

Dear Tiltallers-  we may have discovered a new evil - gunk backs up into the hole in the threaded TEP handles effectively shortening the length of the hole - follow this logic - 'cause its literally twisted - that shortened (shortening) hole makes the bolt coming out of the receiving sleeve (on the head - TEP1,2) or the receiving hole (on the column TEP4s and no longer existing TEP3) too long to tighten. We are speaking here of your existing handles (not a new replacement handle, see below).

A further symtom is that your handle is filled with the evil gunk is that the handle just seems to keep turning but the head or column never tightens.  (Do check that the bolt head is not spinning - yet another issue.)

In an earlier post (several actually) I suggested adding short tubes or "bands" as the way to "shorten" up what had become the too long bolts coming out from the sleeves.  You could also have cut off the now too long bolts with a Dremel - BUT NO!  WD40 to the rescue.

If all this sounds familar, clean out that handle hole.  Fill the hole with WD40, maybe overnight, find a long dental tool, long nail or something to "stir" the bottom of the hole in the handle and clean out that goop that over the years has move to the back of the bus and become compacted.  Repeat as needed and be gentle in your testing as that newly loosen "stuff" can again get pushed to the back/top of the threaded hole as you make your tests.

This was discovered thanks to one of our Tiltallers of the Leitz Chapter sending me her puzzling tripod and me pondering over a turning but not tightingen handle - finally realizing - big dah! - that the gunk can also shorten up the depth of the hole - who knew?  Now she kindly asks if she owes me something for this discovery - I dont know that anyone can owe anyone anything that should have been an obvious piece of logic, but. . . to the great three-peds-to-stablility cause - my website does feature a "buy me Joe" link.

That said, the new, currently made TEP handles do not have threads/hole cut deep enough for use with Marchioni, Leitz and the StarD - you will need to pull out the Dremel to cut off the too long bolts or add the extension tubes to effect a shorter bolt.

Sunday, February 23, 2014

What happened to TEP3 and other esoterica.

I will be posting some answers to frequent questions here for a couple of weeks and then will move those comments to my new FAQ page here - see to the right under "Order Parts" etc.
-------------
Bill-  Pass this to your new Ebay buddy.  I dont know if either of you got a chance to wander my blog posts.  If so, you see that there have been between seven to nine "official" changes of ownership of the Tiltall name and design iterations since the Marchioni brothers retired and sold to Leitz.

Re: yes we have no TEP3 - The thinner disk "column" handle, TEP3, stopped being produced in the mid 80s in favor of two TEP4s.  Many Tiltall afficianado eschew the TEP4s in favor of two TEP1 for the column position - they are interchangeable.  You can still find it on Ebay - I see TEP3 handle only about once a year.

[I always suggest, rather than buy anything my site, you purchase by Ebay, two identical Tiltalls - make the one perfect unit and part out the remainder of the crippled one - you will more than recover your original cost - cuz of folks out there in the situation just like you.]

And in the last production in September, the current manfacturer in Taiwan, KingHome, also changed to only two handles - the longer TEP2 head handle and the other three handles, formerly TEP1, TEP3 and TEP4, are just TEP1 - that is, to repeat - no more fat disk "TEP4" nor thinner disk "TEP3".

Long and short of it (fat and thin, really) is now the bullet shaped TEP1.  A long time favorite "illegal" handle for the column positions since the Marchioni brothers first introduced Tiltall in 1946

That said, your next question will be how to use a Tiltall with a ballhead - why am I mentioning this? - because if this has even crossed your mind, doing so frees up the two top handles (you'll have a spare) for use down at the column/leg apex where your have a TEP3 missing - and my headless column is $45 (+$10/post) vs your TEP1 handles at $15 - take a look below.


Saturday, February 22, 2014

Ballhead 201 - Separating the head from the column

I will be posting some answers to frequent questions here for a couple of weeks and then will move those comments to my new FAQ page - link at the column to the right under "Order Parts" etc.
-------
Dear Oliver - I have an original "Leitz" Tiltall tripod purchased in the 70's or early 80's. It has sat with little use but now I am doing more shoots from tripods and would like to swap out the pan/tilt head for a RRS ball head (3/8 inch mounting screw). I already have lots of RRS camera brackets and lens plates.I tried to take the pan/tilt head off but quickly got stymied. Can you advise how I might remove the existing head and add a new ball head to this tripod? Thank you, Jim Connors

Jim - I know of those who like the ballhead idea so much they were happy to attach it to the camera platform above the three (four) points of control on the Tiltall's tilting head.

Then there are a small group of probably French anarchists (five, so far, including myself) that whacked off the tilting head with a chop saw to separate head from its column.  At this point, there is bump in the learning curve - I lost my head and my column in my first attempt.   (Leitz btw did have a model with a removable head - there is a post here somewhere.)

How to lose your head: Put away that guillotine - remove the one obvious screw and, the occult info - heat the head base with a torch until you break the hold of the epoxy glue between the column and the head assembly.

Now you have a column free of the head, but  nothing to attach your ballhead to. So next find that machinist with a lathe and make a platform/insert piece to place at the top of your headless column - then drill and tap a thread up the center and insert a 3/8"-16 allen bolt to which you will attach your ballhead. If you make the platform/insert removable, you can re-attache the original Tiltall head at a later date.

However, I think Oliver has in mind a solution that does not quite match your request.You asked how to remove the head from the column (answered above). I offer a $45 column without a head (add $10 for priority post.) You set your original column/Tiltall head aside - no destruction or blow torch necessary Information about this column follows.  If not, the link is here. -Gary

Monday, August 26, 2013

Mark Marchioni, Pulp Artist

Who knew? Certainly not I nor any other photographer.  But our own Mark Marchioni of Tiltall fame was first a well trained and well known "Pulp Artist" who began commercial illlustration from the mid 1930s on into the 1940s. (Click to enlarge examples)

Here is what Mark's nephew, Bill Kellen, recalls when I asked him about Mark's "secret" life:

"Mark was an illustrator in the 30’s. Then, when the war came, he and Caesar worked machining war goods. Bendix, as an example, was one of the companies they machined goods for. Caesar liked photography, and that is one of the reasons that Mark came up with the design of the Tiltall Head and Tripod. Once the war was over, they started making the tripod which became one of the most famous and best in the world. I still run into people every once and a while that have a Marchioni original and they love it. When Mark began working on the Tiltall, he stopped illustrating and really never talked about his early career. I never knew about it until I was in college and only by accident, when I saw some of his drawings in the attic at 51 Chestnut Street, the family home. So it is not surprising that Leitz or others did not write about it."

Bill sent me a link to a well-researched history about Mark Marchioni together with examples of his illustrations written and preserved by "pulp art" historian, David Saunders, son of the illustrator, Norman Saunders - read on:

"Marco Enrico Marchioni was born October 23, 1901 in Manhattan, New York City. His father, Franco Marchioni, was born 1868 in Vodo di Cadore, Italy. His mother, Angela Marchioni, was born 1878 in the same village. His parents married and immigrated to America in 1898 and settled in Brooklyn. They had eight children, of which he was the second born: Caesar (b.1900), Marco (b.1901), Ricardo (b.1904), Fiorenza (b.1908), Giovanni (b.1910), Elena (b.1911), Dora (b.1914), and Madeline (b.1917). They lived at 98 Vernon Avenue in Brooklyn.

"His parent's hometown, Vodo di Cadore, is a mountainous municipality in the province of Belluno in the Veneto region of Northern Italy, which is north of Venice and south of the Austrian border. Vodo di Cadore is famous for ice cream. His father and his uncle, Bartolo Marchioni, opened an ice cream factory at 21 Ann Street in the Lower East Side of Manhattan. In 1903 they invented and patented the world's first mechanical device for manufacturing ice cream cones. In 1912 the Marchioni family returned to Italy and spent one year in Vodo di Cadore, where his parents hoped their children would learn the traditional lifestyle of their ancestral village.

"At that time in Italy a radical new art movement called Futurism was causing a sensation in the Italian press. The Futurists rejected the Old World lifestyle and embraced a revolutionary vision of a mechanized society that was brutally fast-paced and unsentimental. It is interesting to consider the impact of these radical ideas on an impressionable young artist, whose own work curiously reflects the Futurist's visionary fascination with awesome mechanical complexities. In 1914 the Marchioni family returned to Brooklyn, where the prosperous ice cream business permitted them to leave the unhealthy squalor of NYC and buy a home in Rutherford, New Jersey at 51 Chestnut Street. He attended public school in Rutherford.

"During the Great War he was too young for military service. In June 1920 he graduated from high school in Rutherford. During the 1920s he continued to live at home, but he began to commute to NYC to study at the Art Students League of New York, where George Bridgman (1865-1943) and Frank Dumond (1865-1951) were his most influential teachers. In 1928 he studied at the Grand Central School of Art, where his drawing teacher was Arshille Gorky (1902-1948), the founder of the modernist art movement, Anamorphic Abstraction. One of Gorky's other art students was Willem DeKooning (1904-1997), who became America's foremost Abstract Expressionist, and always acknowledged his debt to Gorky.

"Marco "Mark" Marchioni's fascination with complex machinery found a grateful audience in the innovative field of science fiction. He sold his first illustration to Hugo Gernsback's Air Wonder Stories in 1929. He went on to draw black and white story illustrations for most pulp magazines in the science fiction genre, including Astonishing Stories, Astounding, Startling Stories, and Thrilling Wonder. He illustrated a regular three-page feature in Thrilling Wonder, called SCIENTIFACTS, which presented a variety of "incredible but true" science facts. Besides illustrating science fiction pulp magazines he also worked for a variety of art agencies that produced newspaper and magazine advertisements.

"During WWII he was over forty and not selected for military service. His lifelong interest in machinery lead him to invent a coin-sorting machine, for which he and his older brother Caesar won a patent in 1944. In 1946 he and Caesar invented and patented a sturdy but maneuverable aluminum camera tripod, which they called the Tiltall. Rather than sell the design to a manufacturer, they started a small factory in the family garage and placed ads for the Tiltall in photo magazines. As its reputation for superior performance grew orders flooded in, and the brothers hired five full time employees.

"According to Caesar Marchioni, 'Always we hoped to catch up so we could get the time to expand, to plan a factory and so forth, but always the orders kept coming in.' The hired five full time employees and managed to produce five thousand units a year. Finally in 1973 they sold Tiltall to Leica, the famous German camera company. In 1975 he retired and moved to 18035 Citron Avenue in Fontana, California.

" According to the editors of Thrilling Wonder, "Mark Marchioni is a serious, dark-eyed chap, who likes good books and music. His favorite hobby consists of fooling around with mechanical gadgets. His favorite authors are Eando Binder, Dr. Keller and Edward Elmer Smith, Phd." Mark Marchioni died at the age of eighty-five at his home in San Bernardino, CA, on October 15, 1987."

Curiously, I am writing this post in San Bernardino CA.

Sunday, August 11, 2013

FEET. . .the final frontier


Bear with me as the three photos here will make no sense without a lot of explanation.  Many of you write me regarding foot replacement, but this is a knotty conundrum (see earlier post).  I will try my best here to answer the requests and make an inexpensive suggestion below.

To wit: the original Marchioni had a foot design with a fixed rubber tip and a descending spike which the Leica folks continued (middle photo, upper left) until near the end of the Leica Tiltall (my conjecture) when they changed to a simple no-spike rubber foot (middle photo, bottom center).

(ASIDE: The cheaper and wiser no-spike foot version appears to have happened at the same time Leitz discontinued the metal tag in favor of the cheapo paper sticker. The sticker idea continued with Fred Albu's Unifot and Star-D on through various iterations to this day - though KingHome now has a paper sticker on one of the legs - to be changed shortly to a "laser" etching.)

Following Leitz, Fred Albu of Camera Barn (another earlier post) made several slight redesigns to his Unifot version of Tiltall and in his Star-D (see original Star-D before Mr. Albu).  Fred reversed the foot design to a fixed spike with a descending rubber foot that continued from his Unifot/Star-D to the Omicron and to the current Tiltall by King Home Taiwan.

We're not done.  Oliver Yang, KingHome, has discontinued the Fred Albu design (TEP-5) and has recently redesigned the King Home Tiltall foot, making a very beautiful iteration of the earlier Marchioni/Leitz design - the fixed rubber with descending spike (bottom photo, left).

Here's the rub.  The threading on the Marchioni foot is different than the Leitz is different than the Unifot which is the same its brother, Star-D, which is the same as the Omicron and the same as the KingHome BUT it has been discontinued.  Enlarge the bottom photo with a click and note that Oliver has correctly made his new version without threads - good thinking!  Lots of glue should resolve this historic mess.  But expected sell price will be $15 per foot inclusive of shipping. This foot iteration should fit all Tiltall iterations.  However a matching set of the new feet will cost as much as an entire Ebay'd Tiltall - and from the Ebay deal you would also get an entire set of replacement parts - aka the entire tripod - with your three replacement feet.

Here's the better idea. DUMP THE SPIKE, GET A RUBBER.  For me, the only time the spikes in my Tiltall feet seem to become deployed is at the very moment I set the TILTALL down on my client's newly polished maple floor.  Forget the spike, and solve the replacement foot question inexpensively and harmlessly just as Leitz did in their final iteration.

Where to find a RUBBER: visit your closest home medical equipment supplier for a 3/4" rounded cane tips. The "rounded" specification is important vs the "flat" cane tips. But the rounded tips seem to be harder to find, often at $15 each.  I best I have found (shown in the middle photo, left) are from Canes Canada 2632 Garland St. Calgary AB T3E 4E3 Canada, tel: 1403-217-8091  Cost of minimum purchase - 6 pieces 'cause you need 3 packets of 2 each - with shipping was $22 Canadian or about $3usd each.  If you cannot find a cane tip, then search for "rubber leg tips 3/4 inch" (photo, below) from Amazon - at about $6 each plus shipping.  Finally, back up to the bottom picture above, Home Depot does offer white rubber tips - four pieces for $2 or $.50 each - white is OK - but the black spray paint will cost you $10.  Or, best, search Ebay with "black 3/4" rubber chair leg furniture tip" and find the deal for 24 Shepherd tips at $0.66 each and make friends with all the Tiltall owners of the world.

Hmmm? OK, maybe such a good idea, I will do it - but they would not be less than $10 per set of three with postage.  UPDATE:  I followed my suggestion and have added one or three BLACK Shepherd rubber "tips" to my replacement part offerings.

Rubber Leg Tips Black, 3/4" from Amazon at $6 each with shipping

Friday, August 9, 2013

KingHome Handles (now) with Marchioni Threads (then)

Not only the original Marchioni.  The next two iterations, Leitz and some Unifot/StarD, also have the long threads.  When ordering the top handles (TEP-1, 2) for the camera platform, note that the Marchioni original (right) has two very long threaded bolts compared with the current KingHome Tiltall (left).   This means that you will need some kind of tubular spacer placed onto the bolt to effectively shortening the threads inorder for the present handles to work with the original Marchioni.  Steve Krauss (below) reports that the part "Hillman #880414" from Lowes works well. Again, this is because the current handles are not as deeply threaded as earlier.  Change seems to be at the Unifoto iteration.
As example, this correspondence from Tom Conway - Hi Gary, I just now noticed that the new TEP-2 handle won’t lock the elevated position when screwed in all the way like the old one did. The short handle does lock it. I can see that this replacement TEP-2 wasn’t machined completely. The thread goes all the way to the end. On the short one, the thread is recessed back in about 1/4 “. Also I see that this replacement TEP-2 is aluminum while the original appears to be stainless steel. Can you please help me? I need the new TEP-2 part you sent me replaced. It is defective. It won’t lock the mechanism. Is there any chance I can get an original part? If not, do you have one that is properly made to replace this one? Thanks,Tom Tom- With TEP 1 and 2 and the original Marchioni, I have learned that the length of the receiving screw is part of the mix and can be solved with a spacer. - Gary
Gary- A ¼” piece of 3/8” copper tubing worked perfectly! The original short handle has the same thread depth, but is bored out to 5/16” diameter for the first ¼”. I would have done that if I had a floor stand drill press. My bench top drill press couldn’t accommodate the TEP 2 length. - Tom
Tom - So if I follow the 5/16" depth reasoning, that extra bore size IS a sort of spacer when the original TEP1 reached the bottom and begin to tighten. I wonder what the thinking was vs today's Tiltall? May I add this info to that blog post? - Gary Gary- I think I’d call it a sleeve that has to slide between outer cylinder and the threaded shaft. Feel free to put the info on your blog. If I get a chance, I’ll make a drawing showing how I think the mechanism works. -Tom

Another update from Steve Krauss (Feb 2014) - I finally had time to run by Lowes and get some steel sleeves - 1/4" x 3/8 x 1/2" - they work PERFECTLY, just as you indicated. These steel sleeves I got are dimensionally identical to the handle - same outside diameter, slide perfectly over the threads, perfect function. It's a "Hillman #880414". Thank you so much for your fine parts and help. Now I have two fully-functioning classic Tiltalls! With my carbon fiber Gitzo I'm well equipped.

Saturday, June 29, 2013

Leitz Tiltall with Removable "Tiltall" head

If there has been a single plaint these years regarding the Marchioni brothers' design, it is the non-removable Tiltall head. And for about that same length of time there has been a rumour that Leitz had played with a short lived version with a removable head. I had never yet seen one.

Thanks to a TEP Handle inquiry from Alan Abramowitz (http://abramowitzstudio.com) and his photographic proof above, we have our evidence (click to enlarge).  What history we have come by seems to suggest that the brothers begin Tiltall as a head-only design, but once attached to its body, both the Marchioni and the iterations that followed - with the Leitz exception above - Unifoto and its brother, Star-D; Omicron and presently, KingHome - all have stayed with a fixed head design.  Thank you again, Allan for your photos.  If others have discovered some Tiltall variants in their travels, please drop us a jpeg to post.

Another variation of the Leitz Tiltall from Mike Campos - here the head unthreads from the column itself.  Not, as above, from a more expected a 1/4-20 threaded bolt.  I have not tried to remove my head from the column with my four Leitz by unthreading - I will.  From the Uniphot to present, the column was glued into place.  Also, as above, Mike's Tiltall head has a separate label on the head - and a metal one at that.  All my Leitz Tiltall have only the "body" label - a couple, metal and a couple, paper.


Thursday, April 18, 2013

Ball Column Zen

Message: Would like to mount a ballhead to my Tiltall...is the telescoping column the only available solution? Thanks, James

James - "Only available solution?" I had better play it with an extra safe answer, "Probably, no" - as all cat skinners know, there is always another solution.

Top three ballhead/column solutions-
1) Reverse the existing column (if your Tiltall is Unifot or later) and use the 1/4-20 TEP6 to mount the ballhead.  If you have Leitz or Marchioni, have a machinist create a removable stop/platform for the bottom of the column with a tripod thread (1/4-20).

2) Cut (I did this, so I am not joking) the Tiltall head from the existing column and have a machinist create a  platform/plug for the top of the column. [Note: one need not cut the head off the column.  The trick is to remove the small screw from the side of the head/column nexus and heat (gas torch) the head/column until the grip of the glue releases - ofcourse you dont learn this until after you have cut off the head.]

3) Buy an used Tiltall from Ebay - same manufacturer as your Tiltall - remove one of the legs - which just happens to be the same diameter as a column - have a machinist create a platform/plug for the bottom of the end of the middle leg section - then you have a telescoping column and two extra legs to sell off to other DIY column makers and a extra head/column to restore the head/column destroyed in #2 above.  [Read on -  we've been down these cat tracks already.] -Gary

Tuesday, February 5, 2013

Tiltall and the amazing Anson Nordby

Dear Mr. Regester, Thank you for your response to my inquiry about obtaining a new leg for my Tiltall tripod. I am sending the entire tripod assembly to you for correct parts. In addition to the leg assembly, it will require a number of additional parts to restore the tripod to be complete as it was when new. Let me tell you briefly what I am up to. I have so far collected three of the great older model Tiltalls. I place them with time lapse cameras in the Death Valley area of California (well camouflaged) for one to three days to catch the moving shadows and clouds in a time lapse movie.  My goal is to have five complete tripod/camera systems. This tripod will be number four. Thank you for your help. If in addition to the parts for this tripod, you have another complete tripod for sale (one of the good ones with the brass jam fittings on the legs) I would love to buy it. PS: I was out in the Owens Valley and the Alabama Hills the first part of this past week. I have attached some tripod photos for your blog. Best Regards, Anson Nordby


For Anson's first timelapse post in May 2013, a storm over Mt. Whitney

Sunday, October 7, 2012

Hybrid Tiltall Thoughts


Thank you Ellen for your questions regarding Tiltall for birding.  Several ideas with notes:

A - The original stock Tiltall head and column assembly - seemed to have gone missing in your photo of your Tiltall - often considered too complicated for easy travel and "bush" work - handles however can be carried inside the length of the current center column and hidden out of the way.

B - a telescoping and headless column made from one leg of the TILTALL - increases column length by 18 inches - meaning a birder could extend the column to comfortable eye level, but not need to extend the three legs as much as with the normal head and column - so much less tripod foot print around your feet.  See an earlier "birder" prototype post.

For a photographer one could extend the column and legs 18 inches higher than the original - OK for smaller cameras, not OK for that 4x5 field camera (am I showing my age?).   I expect to have this monocolumn available by the end of the year - expected price $55 with shipping - pre orders $45 with shipping.

CHeadless column  - you choose the articulating device (monoball, other brand tripod head) - usually more compact than the original head design - same length column as original - 3/8-16 thread right and "top" end, 1/4-20 thread on left and "bottom" end - this is a black prototype similar to my run of a silver headless column which has sold out and I am not planning to do another production run.

D - a very hybrid TILTALL using KingHome "Tiltall" four section "monopods" for both its column (D2) and three supporting legs (D1) - the center column could be reversed as "B" above extended to another four feet longer than "B"  - also note the altered one handled camera platform - this would be smaller and less expensive if one was only using a scope or video cameras - rather than cameras where you do NOT need the second 90degree gimbal.   Completely a concept piece with no expectation of production.

E - Standard TITTALL included for comparision of length with all the items above it.

Last note: maybe hard to visualize, but "D" can be used as a video motion stablizer - extending the center column as a monopod and extending the three legs laterally as balance arms - I said "hard to visualize"  - see my earlier design Handipod.

Thanks for your interest in scope use - your timing was good. Photo below - Telescoping center column installed with scope.  Click on any photo for enlargement.


Thursday, May 10, 2012

Tiltall Explodes

See parts page (link at upper right) for order information.

Saturday, April 28, 2012

Marchioni Bros. History in Leitz Brochures

Leitz Tiltall brochure below, c.1974. Courtesy: Richard Haeseler, New Port Richey FL USA Leitz Tiltall brochure below, c. 1981. Courtesy: Pacific Rim Camera, Salem, OR 97302


Monday, April 23, 2012

Current Leg Bushing Modified to fit Leitz


Hi Gary,
IT WORKED!!!!
I have attached pictures of the before and after process.
My friend Gary (Hmmmm  Something going on with that...)
cut the flat non beveled part and then whittled it down to the right thickness
He put the piece over a wooden dowel and duct taped over washer
then he used a small saw (hacksaw) with a fine tooth blade and cut it by hand
I guess you could use a dremel, but this seemed the better choice.
I am holding on to the other washer as is and if over time the current resized washer
works, then I will go ahead and make another...  If not, then I will not cut off the non
beveled section and then whittle it all down...  that leaves the washer a little
wider, then I can (hopefully) slide that elongated thin part under the larger/upper leg...
if that makes sense to you
Anyhow, I don't claim to know the parts of the tripod so...  if you would like to share these pictures ...  I will leave the description up to you.
We used a dremel with a sanding barrel tip to widdle it down
Thanks Gary,
Beth Pauze


Sunday, April 1, 2012

StarD. . .Mystery Resolved?

On Sun, Apr 1, 2012
Subject: Tiltall Story

Message: The Tiltall story still seems to be a bit foggy. I intend to update the story at photoscala.de and would like to mention your website.

Since the Davidson Optic company is now a subsidiary of a German company in Wedel, I'll ask them for any details. I'll let you know about their answers.  Best regards, Christoph cj@photoscala.de

Dear Christoph,

Yes, please link me and I am remiss not to have linked to you earlier and will do so - actually, now. . .this email is immediately upload to the blog.

Foggy indeed.  Two days ago I had a quick conversation with Steven Tiffen (CEO, TIFFEN Filters, etc and son of the founder of TIFFEN).  Steve was a teenager at the time but added this hint to the fog.

According to Steve:  PhotoBarn's Fred Albo bought the trademark "StarD" from Davidson in the late 70s or early 80s when they decided to stop their manufacturing of their tripods.  PhotoBarn had been a "StarD" tripod retailer up to then.  Fred also either had or would shortly acquire the rights to the TILTALL mark and its design from Lietz.  Fred then split the TILTALL design into two versions -  a low end "StarD" for "mass marketing" and the Unifot Tiltall for pro stores which more or less continued the Marchioni/Leitz features, except for simplification of the leg bushes (no brass). I think we are close to closing the case.


--no fooling!  Gary